
I spent my third session in the recording studio capturing recordings of an upright piano. To make the recordings, I used a variety of microphones and microphone positions to gain an understanding of how each of these affect the sound of the recording. Furthermore, I also experimented by taking the covering panels off the piano to reveal the strings to see if having the strings exposed or covered made a difference to the end recording.
The microphones, techniques and positions I experimented with were:
Microphones:
AKG C214 x 2
I used this microphone for the capture of all recordings i made of piano.
I did this for the following reasons:
Frequency Response – The C214 generally has a good frequency response so all frequencies produced by a piano. The frequency range of a standard, 88 key upright piano like the one I recorded is 27.5Hz – 4186Hz. The C214 has a good frequency response from around 50Hz through to 2000Hz, making it good for capturing the middle frequencies produced by the piano and then has a peak in response between 2000Hz and 5000Hz, making it good for capturing the piano’s high frequencies. However, the microphone isn’t very responsive to frequencies below 50Hz, in the piano’s lower frequency band. But, for the excerpt I recorded for the experiment, I didn’t need to use the notes in this lower band so the microphone was therefore suitable for the recording task.
Frequency Response Graph:

Polar Pattern – This microphone has a cardioid polar pattern which means that it captures sound mainly from the front. This made it suitable for the task of recording piano as a majority of the techniques I planned to and recorded with involved close mic’ing so the microphone I used needed to record sound exclusively from the part of the piano I positioned it at.
Sensitivity – The C214 has a high sensitivity of 20 mV/Pa (milliVots/Pascal) allowing it to capture a wide range of the piano’s dynamics when being played. However, as it is a sensitive microphone, I had to use low gain levels to stop the signal from clipping when the piano was being played loudly.
Other Equipment:
- Focusrite Scarlett 2i4
- Microphone Cradles
- Microphone Stands
- XLR Cables
Techniques:
Mic’ing The Back of the Piano:
The first technique I tried in this session was a close mic’ed microphone on-axis to the back panel of the piano. A recording classes as close mic’ed when the microphone is placed within 30com of the sound source, which was the back panel of the piano for this recording. The microphone I used was an AKG C214.
The positioning of the equipment I used to make this recording is shown in the picture below.

Please see “Piano – Close Mic – Back of the Piano.MP3” to hear the recording I captured using this technique.
The recording produced from the use of this technique was very nasally, restricted and thin, lacking in both high and low frequencies. However, the recording was still clear and strong but didn’t capture much of the performance’s articulation, sounding slightly muffled.
Ambient Mic – Room:
The second technique I made a recording using was an ambient, room microphone. This meant that I placed a microphone somewhere that was more than 30cm away from the piano to capture the room’s sound, like reverb as well as the sound of the piano. I used an AKG C214 to do this.
The setup I used to make this recording is depicted below.

Please see “Piano – Ambient Mic – Room.MP3” to hear the recording I captured using this technique.
This recording sounded distant and it was clear that it was recorded with an ambient technique. Tonally, the recording was quite dull, thin and nasally whilst still being clear and articulate. The signal in this recording was strong. If this recording were to be used in conjunction with a close mic’ed technique, it would add depth and liveliness to the recording.
Ambient Mic – Cymbal:
For my third recording, I decided to experiment with an ambient room microphone by placing an AKG C214 next to a cymbal. I hoped that the microphone would capture sound that had reflected off the cymbal and wanted to see if the cymbal had affected the sound in any way.
The position of the microphone is shown below.

Please see “Piano – Ambient Mic – Cymbal.MP3” to hear the recording I captured using this technique.
The recording captured using the microphone in this position sounded thin and nasally when listening back to it, due to an emphasis on mid frequencies within the recording. It was also clear that the recording was ambient due to it sounding distant to the sound source. Nevertheless, the recording was strong and could easily be paired with close mic’ed techniques to liven up the feel of the track.
There was a small amount of spill in this recording due to members of the group I was working with moving around and other, general noise from the music department. However, in a real recording environment, this wouldn’t be the case as measures would be taken to ensure that the department was quiet and that nobody unnecessary to the recording was in the live room so I wasn’t too concerned about the spill as it was a high quality recording, that was clean for the most part.
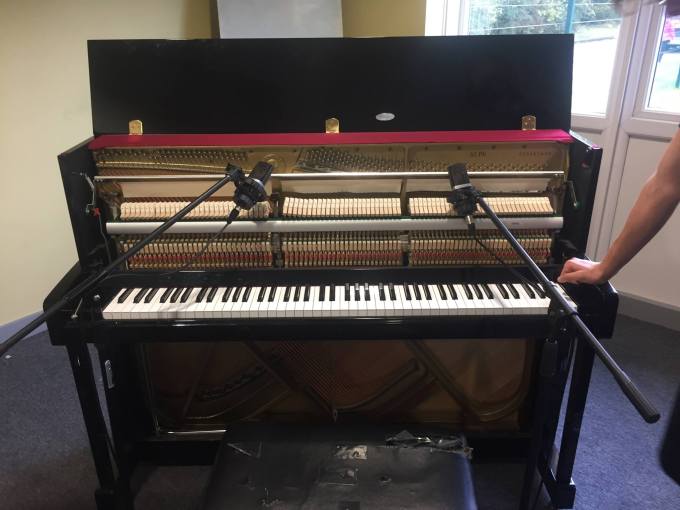
Close Mic’ed Spaced Pair – Top Strings (Stereo Technique):
The first stereo technique I recorded was a standard, close mic’ed spaced pair of the top set of the piano’s strings. For this recording, I removed the piano’s top panel and placed the microphones over the hammers of the lowest and highest notes played in the performance. The microphones I used were AKG C214s.
As this was a stereo technique, i decided to experiment with various degrees of panning post recording.
I first panned the left microphone left a quarter turn and the right microphone to the right a quarter turn.

Please see “Piano – Stereo Techniques – Spaced Pair – Top Strings – Quarter Turn.MP3” to hear the recording I captured using this technique.
I found that this made very little difference when listening back and had very little effect on the location of the piano within the stereo image of the mix, meaning that this panning setting had a poor stereo image.
I then increased the panning on both pots until the microphones were half panned in each direction.

I found that this panning configuration made it clear to distinguish the notes that were played on the right hand side from the notes on the left, whilst the bleed from both sides into the center gave the effect of the sound being fuller.
I then panned each microphone all the way in each direction

I found that panning the tracks in this way created a very strong stereo image as it made the listener feel as though they were sat playing piano as all the low frequencies were coming from the left hand side and all the high frequencies were coming from the right hand side.
The positions of the microphones are shown below.
I found that this technique captured a bright, strong and clear recording that fully captured the piano’s ambiance and resonance. The stereo image created was strong as, once panned, it was clear which side of the piano was being played as low strings would play from the left-hand side of the headphones and high strings would play from the right-hand side of the headphones. However, the stereo image didn’t feel very wide as the microphones were fairly close together as they were positioned at each end of the area of the piano that was being played and not the whole piano.
Close Mic’ed Spaced Pair – Bottom Strings (Stereo Technique):
The final technique I recorded in this session was a close mic’ed, spaced pair recording of the piano’s bottom strings. To gain access to the bottom strings, I removed the piano’s bottom panel and then placed an AKG C214 on either side of the strings.
The positions I placed the microphones in are shown below.

Please see “Piano – Stereo Techniques – Spaced Pair – Bottom Strings.MP3” to hear the recording I captured using this technique.
The recording captured using this technique sounded very nasally and restricted due to a prominence in mid frequencies. The recording was clear and strong. Additionally when panned accordingly, the recordings formed a strong stereo image as the low strings of the piano could be heard from the left-hand side of the headphones and the low strings could be heard from the right hand side of the headphones, immersing the listener into the recordings as it seems as if they are sat at the piano playing it.
